Tuesday, September 29, 2009

some quilting stuff

Do you ever have a week where you realize it's Tuesday and already you feel behind? Well, welcome to my week!

I did finally get my strips cut for my wonky log cabins for the quilt-along.


I tried to get a nice artistic shot of them all laid out  - but this is the only one I got before the wind blew them all over and I didn't have time to do it again!  You can see a better picture of all my fabrics here.


I think I'm going to do the wonky squares-in-squares log cabins.  Quilt Dad wrote us a great tutorial here.

I'm feeling like I have one too many projects going on right now.  Not to mention the friendship bag I have to get done for the swap!  I think that will be my sew & tell for Friday.  What are you working on for Friday?

I would LOVE to have one of my big quilts ready for the Blogger's Quilt Festival that Amy is hosting!  Are you all ready?  It's in just a couple weeks!  Click on the button for more information!


Friday, September 25, 2009

sew & tell v. 1.0.4. or blogging = accountability


I have to say, if I hadn't told you all on Monday that I would have my bird quilt top done by today, I don't know if I would have made it! So thanks to you for keeping me from procrastinating. I haven't been feeling quite well, but I managed to get it done.


I really like it! But I'm still unsure if it's giving the effect that I wanted. In fact, I'm counting this as a finish because of all the work that has gone into it - but, I may add a dark border around the whole thing, so that it really looks like a window in a wall, looking out into a tree full of birds. Here's a close-up of the window panes.

window pane insets

Any thoughts on another border? I'm going to bind it in a red and white polka dot (why yes, the Amy Butler dots, of course!)

And just for fun, this is how I hung it. I really wish I had an honest-to-goodness clothesline.

my makeshift clothesline


Are you ready to share your finishes and accomplishments from this week?! We are all ready to see them! Please follow the sew & tell rules below.

1. Link to a post about a finish you had this week (don't just link to your blog, please!)
2. Link back to this post so more peeps can join in the fun! If it is a post from earlier in the week, just please add a note about sew & tell. Now that we have a button this is super easy - you can just cut and paste the html in the sidebar.


3. Enjoy getting motivated and patting each other on the backs in the comments! This is the funnest part about sew & tell - sharing and inspiring!

Tuesday, September 22, 2009

button, button, who's got the button?

I've heard people say that the blogging community can be a bit harsh and negative.  But I don't think those people are a part of our little crafty sewing blogging world!  I have met some of the nicest, most creative, friendly souls in the year or so since I transformed my blog to join your ranks!

I'm constantly inspired as I see what every one else is creating, quilting, sewing, crafting.  I feel connected, when I'm stuck at home, slave to a nap schedule.  I am motivated to finish projects that would normally sit undone, so that I can share them with you!

simply square button


This is part of the reason I started Sew & Tell - a weekly opportunity to motivate us (myself as much as anyone) to keep on keepin' on.  AND to have an opportunity to meet new people and be inspired.  We've only been doing it a few weeks so far and it's been a lot of fun!  I've met some new people and seen some amazing projects!  So I thank you all for sharing - and look forward to many more!

My evil plan is to take over the world, one motivated sewist at a time.  (insert evil laugh here)

Speaking of nice people....  Jodi, of Pleasant Home, and I were emailing last week and she offered to make us a Sew & Tell button so we can spread the word.  And she even made it in two sizes!  Just copy and paste the html and use as you please!


125x125 Sew & Tell Button


150x150 Sew & Tell Button


If you feel so inclined, leave me a comment and tell me what you are working on to share this Friday.  I'm still slated to share my bird quilt top!  It just needs the sashing and borders complete...

Monday, September 21, 2009

rocky gap

I feel like I haven't had many crafty things to share with you lately, but I'm planning on changing that soon!  I've got a few things in the works to share in the next few weeks!  And don't forget about Sew & Tell on Friday!  I'm hoping to share my completed bird quilt top - hold me to it!

In the meantime, here's a few pictures from our trip last week.


Yep, fall is here!  I made our first apple crisp of the season last night!

Friday, September 18, 2009

sew & tell v. 1.0.3


Hello! I have been recovering all week from our little getaway.

Lake Habeeb - Rocky Gap State Park, Maryland
I got to catch up on some sleep and that's all I've been wanting to do since I got back!  I hope you are all ready to go for sew & tell!  (yes amy, that means you.  and you too!)

I panicked a little last night when I realized I hadn't touched my sewing machine all week and needed something to post today!

Then I remembered a quick little project that I had been putting off - The Undercover Crate, by the lovely and talented Laura Gunn.  Who I wish I knew (does it count that I know someone, who's sister knows her?  I know, how very Ferris Bueller of me.).

I've been following her blog for a while and was pleased to see that we have the same taste in spray paint.  You will enjoy looking around her blog.  She's got great style.  I just ordered some of her debut line, Lantern Bloom, and I cannot wait to get it!

Anyway, back to sew & tell!  I have a big plan for my bedroom, involving several prints from Amy Butler's Nigella collection.  I made a duvet cover about a year ago.  I ♥ it so much!  When I first bought the fabric I didn't have any idea what else I was going to do.   But it's been evolving into a pillow, duvet, fabric wall art extravaganza!  Expect more to come.

Our nightstands are a bit of the problem in the reading material storage area.  So I bought some ugly crates and decided to try out Laura's tutorial.

I think I'm in love!

And here it is in it's new home:


It's just a small piece of the overall vision, but I can't wait to finish up the rest!  I need to go make the cover for my side now!  This tutorial was SUPER easy and took less than an hour (easily).


Are you ready to share your finishes and accomplishments from this week?!  I'm ready to see them! Please follow the sew & tell rules below.

1. Link to a post about a finish you had this week (don't just link to your blog, please!)
2. Link back to this post so more peeps can join in the fun!  If it is a post from earlier in the week, just please add a note about sew & tell.
3. Enjoy getting motivated and patting each other on the backs in the comments!  This is the funnest part about sew & tell - sharing and inspiring!


Monday, September 14, 2009

a challenge

I just wanted to post a quick little challenge for this week: 
Finish something you've been putting off so you can post it on Friday for Sew & Tell!

*****

Remember the Great American Quilt contest I told you about?
Well, I went ahead and sketched out a block, I call it The Ripple Effect.
I really wish I had Illustrator - but my graph paper will have to do for now.  Please go and VOTE for my entry

*****

My husband and I are off for a little R&R - YAY!  We are going here:

Should be fun!  I can't wait to sleep in!

Thursday, September 10, 2009

a little bag story + sew-n-tell v. 1.0.2

I was worried about having a finish for this week - but then I remembered I FINALLY finished a new bag for myself over the weekend!  I started using it immediately, so I forgot it was so new.

A little background...
Meet my first bag:
 
I love this fabric!  And this bag! It's the fabric that made me stand up and take notice that there was more to the fabric world that what you can buy at a local chain store.  I designed this bag to use as my diaper bag after my son was born.   He is now almost 20 months old and this bag has been through the ringer.
See bag now:
So so sad, and faded, and getting holes and dirty, with no key hook (because I took mine off to put in someone else's bag...)  Plus, I have learned many things and made many improvements in the construction of the 20+ bags I've made since then.

Soooooo, I finally made myself a new bag!!  This is also one of the fabrics that I fell in love with when my eyes were opened to the fabric world - Chez Moi, their original design.  It's out of print and I never bought any.  Lucky for me, my local quilt shop found a few bolts and I was able to snatch up some yardage a couple of months ago!
My bag, v.2.0:
 
I really do love this Jacobean Paisley design and all it's variations out there (part of the reason I named my etsy shop, paisley garden. Side note:  my shop isn't really stocked right now, I'm planning something big though!  Well, big for me.).
I love a contrasting top stitch - and I'm really into green lately.  (Shocker, I know - a slight diversion from my turquoise/aqua obsession).

I love the pockets and key hook inside.  The pockets handily fit a wipe container and some diapers and the second pocket catches all that other stuff - chapstick, lip gloss, mints, gum, little notebook, pen, snacks for the kids, etc.  This time I did the key hook strap out of grosgrain ribbon.  I folded it in half lengthwise and topstitched it down.  I like that it stands out so I can easily find it.
I love how lightweight it is, and  yet roomy so that I can stuff in it whatever random stuff my kids keep dropping on the floor at Costco.  So maybe this bag holds diapers, but it doesn't have to - it's just my favorite bag!

I promise, I hope to have something more than bags and pillows to blog about in the near future!

Sew-N-Tell has been fun the last couple of weeks!  I hope everyone had a productive week and we have fun things to share!  Please read and follow the guidelines below.  Can't wait to see what you've been up to!  Please spread the word - the more the merrier!!

If you want to participate in Sew-N-Tell today here are the rules:
1. Link to a post about a finish you had this week (don't just link to your blog, please!)
2. Link back to this post so more peeps can join in the fun!
3. Enjoy getting motivated and patting each other on the backs in the comments!

more amy butler gushing

I can't help it!  Do you subscribe to her newsletter?  If you do, you got an email announcing her new rug collection. Click here to go see it!  I hope to be the proud owner of one, someday.  Probably the blue Lotus Wallflower one.  Seriously, she is my idol! 

Don't forget to come back tomorrow for Sew-N-Tell!  We've had a lot of fun the last couple of weeks being motivated and enjoying each other's finishes!

Monday, September 7, 2009

crazy dreams

I've been having some crazy dreams again lately.  The other night I dreamed I was working on my bird quilt for my quilting bee, A Notion or Two.  
For some reason I had quilted the back to the batting and was going to put the top on after.  Don't ask me why I was doing it that way....  Anyway, when I went to put the together the back was tiny and I didn't have enough fabric to fix it!  It was really more like a nightmare.

I guess it might be that dream that spurred me onto working on the top.  I have had the blocks mostly finished, a couple needed a little tweaking, plus I needed to add some mitered corners for the shading I was trying.  They've been lurking in the wings not getting done because of my apprehension to do something I didn't know how to do exactly.  Silly me.  Once I sat down and finished them it took no time at all.  
And I think they look pretty good!  Thanks Amy for a great tutorial!

Since I took these pictures, I have the top sashed.  I need to add some more borders and then it will be ready to quilt.  That is, once I have the back figured out.  I'll have to be sure I have enough fabric!

Friday, September 4, 2009

you really oughta check this out

Jodi, formerly of Simply This and That, has relocated her blog.  And made a lot of FUN changes!  It's really a great place to spend some time.  Her new blog is called Pleasant Home.  Click on her button and read all about it.


In addition she's having a TON of giveaways for her open house this week. Just go over - you might win some fabric, or sweets, or home dec items, or...!! well you get the idea.  Now go! Skedaddle!

Thursday, September 3, 2009

sew-n-tell! v. 1.0.1

I think last week was a good start to something fun!  I hope that everyone was motivated to finish something up this week!  I actually was reminded early Thursday that I needed to get something finished up for this post!  How embarrassing - and motivating.  I love knowing that I'm working towards a goal with lots of other people - so thanks! 
 
I have to admit, I didn't get as many things finished by today as I wanted to.  I did finish up another pillow (actually it was the one in the tutorial) but I thought you might be tired of pillows!  (Although, if my sister-in-law comes over today to finish up hers I may just have to share it.  It's REALLY cute. Two words: Limeade Damask.)
I did however, get this curtain hemmed and installed.  Are you wondering what's behind the curtain?  Are you?
I'm sorry, I'm not going to show you.  But let me leave it at this:  I have two toddlers and their playroom/my sewing room/our computer room/ pantry are behind here.  It is the hardest room in the house (besides the kitchen) to keep straightened up.  That's why I've named it - The Vanity Curtain.

This picture was taken from my front door. So you can imagine the first thing people saw when they walked into my house, was not the awesome fabric on my walls to the left and usually straightened living room, but the ugly rental carpet and strewn toys and fabric scraps.  NOT pretty.  A smarty-pants friend of mine suggested I put up a curtain in the doorway - and I was glad I already had this fabric earmarked for curtains!   I really like it and hope it steers my friends into the comfy living room and not our mess!

If you want to participate in Sew-N-Tell today here are the rules:
1. Link to a post about a finish you had this week (don't just link to your blog, please!)
2. Link back to this post so more peeps can join in the fun!
3. Enjoy getting motivated and patting each other on the backs in the comments!

Thanks for playing!

another quilt-along! round 3

I missed out on round 2 of the Old Red Barn Co. quilt-along.  I have it bookmarked to do later. . . . but I'm afraid later won't happen.  So when round 3 started abuzz with a wonky log cabin quilt, I decided to get on board, do it now so it will get done.  I've found I work better with deadlines.

So I was straightening up and organizing my fabrics to see if I had enough fat quarters to throw together.  I didn't realize how many I did have!  I've just bought a few here and there because I liked them, not sure what I would ever do with them.  Then I realized that they all looked pretty good together!  So I think this is going to be one bright scrappy quilt!  I'm excited to get cutting. 

But first I have to finish up a couple things for sew-n-tell tomorrow!  Don't forget to come back and link up your week's finishes!  We had a lot of fun last week!

Tuesday, September 1, 2009

just a little pillow tutorial

edited: in case the pictures weren't working earlier, they should be now!  Thanks!

Well, the pillow isn't that little (although it can be any size you want) but this pillow is super easy to make!  I'd say if you are an experienced sewer you can whip this up in 30 - 40 minutes!  And if you are newer - give yourself an hour!
I made theses pillows for a bridal shower gift.  I had been scoping out her tastes and furniture so I could do something quick and easy.  I didn't have time for the throw quilt I wanted to pull off.  So I made 2 pillows and the day after the shower she came over and I taught her how to make another one.  
Teach a woman to buy fabric and she'll be buried in it.  Teach her to sew and at least she might keep her head above the top of the pile!
I'm not known for my very clever jokes, so pardon me if that was a little silly.  :)
I have a little secret (besides the bad joke telling.  Oh wait!  I don't think that's a secret).  I'm sort of lazy.  I like shortcuts.  I dread cutting things out with regular scissors (thank heaven for rotary cutters) and putting in zippers is tricky (I'll do it if I must), AND if I can avoid hand sewing things closed - I do.  (With the exception of quilt binding - which is always finished by hand.)

The pillow I made for this tutorial is 20" x 20".  Therefore, your supplies are as follows:
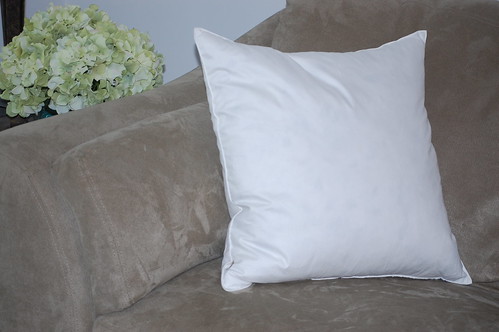
one  20" x 20" pillow form - I prefer feather.
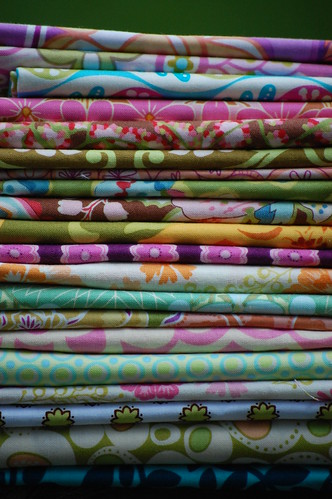
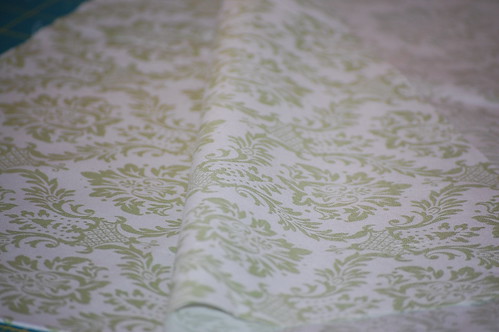
2/3  yard fabric (44/45" width)
matching thread for topstitching
rotary cutter, mat and ruler (scissors and measuring tape will work too)
pins (if you want.  If you are lazy like me then, well, then.....)


1. I start out with a nice fluffy pillow form like this:
I buy mine at IKEA - they are only $6.99 and are feather.  I ♥ IKEA and their cheap inexpensive, fluffy pillows.  The reason I suggest feather is that they pack down really small so when you are doing your last top-stitching, which is also sewing the pillow inside the cover, you can get the pillow out of your way!  It's so great.  It's a little harder to do with fiberfill forms.  You can still do it, it's just a little trickier.  And remember me? Hi! I'm lazy!

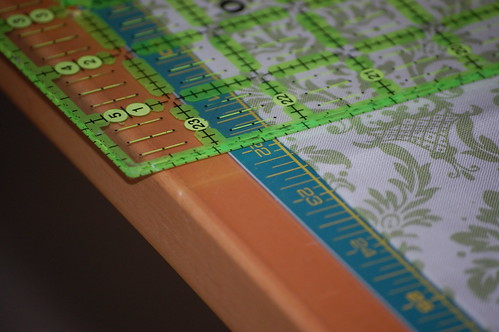
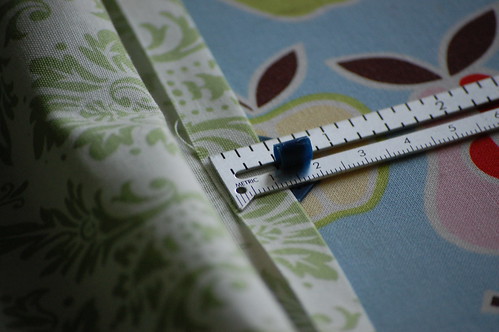
2.  With your fabric ironed and folded selvage to selvage, square it up on your mat.  Then cut the 2 layers into 22" squares (or if you are using another size - 2 inches bigger than your pillow form)  We are allowing a half-inch seam allowance on each side as well as a half-inch flange around the edge.

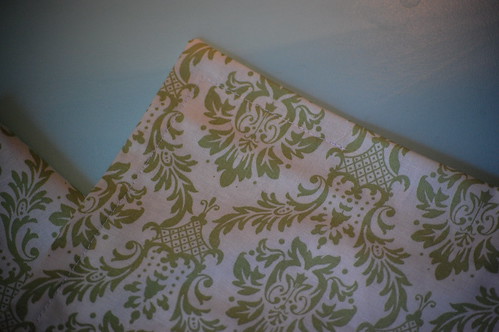
3. Lay your two squares right sides together.  Make sure if you have a one-way directional print, that you have them going the same way.
 

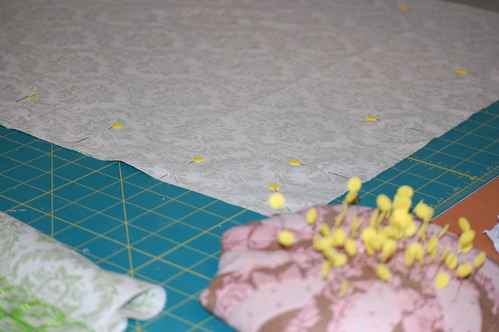
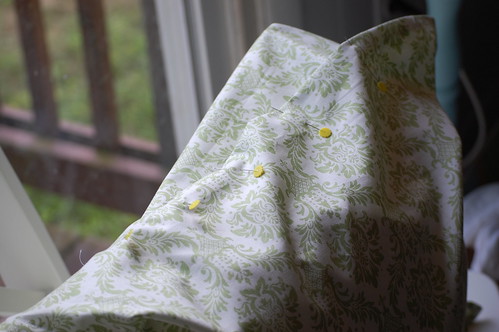
4.  Pin your squares together on 3 sides.  On the 4th side only pin 2" in from each corner.  We will be leaving this side open to put in the pillow form.  If you have a one-way print, I like to leave the bottom open.

5. Starting at the 2" mark on the 4th edge, Line your fabric up for a 1/2" seam allowance.  Start stitching, taking a quick back-stitch to secure the loose threads.  Stitch to the edge of the fabric.  Turn the cover and continue down the adjacent side.  Continue until you have stitched the full length of 3 sides.  On  the last corner start at the edge and stitch in 2" with a quick back-stitch at the last pin.  Don't forget to take out your pins while you sew.  I refuse to admit how many needles I've broken by sewing over pins.
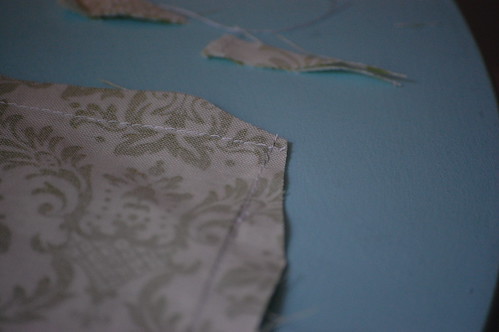
When you look at your pillow you will have 3 edges sewn with the last edge having a large hole in it.  The important thing is that the corners are all stitched on the machine so they look like....

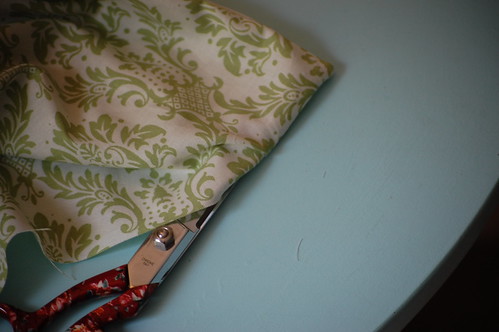
6.  Trim off a little of the edges around the corner so you will get a nice clean point when we turn the cover right side out.

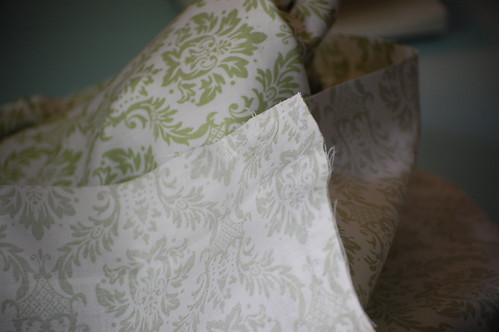
7.Turn the cover inside out!  We are ALMOST finished!

8.  Using something pointy, push out your nice crisp corners.  There are tools for this.  I just couldn't find mine at the time.  If using scissors, be careful you don't poke a hole in your fabric.  Not that I've done that...

9.  Wrong sides together, press your seams and corners flat. Work the seams with your fingers rolling them to the edge so you don't end up ironing folds into your fabric.  You'll know what I mean once you start doing this.  On the side that is open, press 1/2 inch on both sides.  This will prep the cover for stitching it closed on the machine.

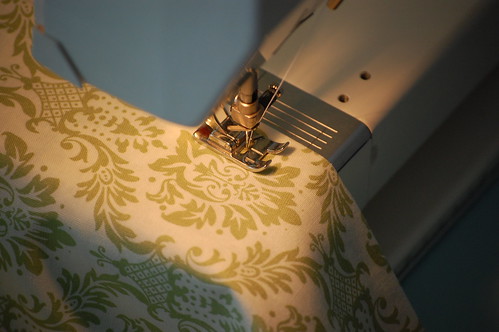
10.  Now for the top-stitching.  With the cover facing you, open end on top, start with the upper right hand corner.  
Find the edge of the opening and line up the edge of the cover with the 1/2" seam allowance line, back-stitch a stitch or two and then sew.  Stop when you reach a 1/2 inch from the next edge.  Lower the needle to the down position, lift the presser foot, and turn the fabric so that you can stitch down the next side without breaking the stitch line.

11.  Continue on until you pivot the last corner, stitching to other edge of the opening and back-stitching.  (click on the image to enlarge and get a better view.  I should have used a better contrasting thread!)
I don't have pictures,  but next, do the same top-stitching, this time just at the edge of the cover.  I like to gauge it by keeping the edge right on the inside of my presser foot.  (I actually did this on the second pillow I made - wait, I'll get the pic..... there we go.  See how there is stitching on the very edge as well?  This makes closing the pillow THAT much easier.)
12.  Fold your pillow form in half or thirds.  Insert it into the cover.  Match up the top two corners of the pillow with the corresponding corners of the cover.  This will ensure that the pillow sets right in the cover and doesn't get all twisted.  Mmmm, yes, maybe I have learned from experience.


13.  Squash the pillow down so that you can pull up the edge that needs to be sewn shut.  Pin the edges together where you pressed  your seam allowance in.

14.  Starting at your back-stitch point, top-stitch the opening closed, 1/2 inch away from the edge.  Again, back-stitching on both ends of the seam.
Repeat top-stitching on the very edge of the opening.  Isn't that sneaky?  No zippers, no hand-stitching....

15.  Now grab the top two corners and shake the pillow down into the rest of the cover.   This is fun - if you have any frustrations to get out, take them out now!  (please not in my comments section - just let me know if I need to explain something more clearly!)
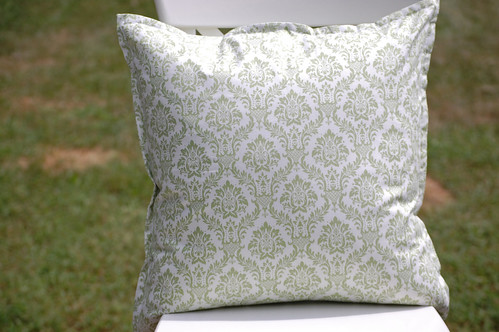
And there you go!  A very cute and (hopefully) easy pillow!
If it needs a fancy little sister you can always add some pom-pom fringe!
Let me know if you make any pillows! 
In fact....  because you needed another Flickr group, you can add them here!  amylouwho tutorials
I'm just warning you, Flickr is addicting!
PS - I found a 30% off coupon code for Fabric.com 2PLTRY9,  you're welcome!
PPS - This is my first tutorial, so any help in making it easier to follow is welcome!